The Red Castles (February 2021)
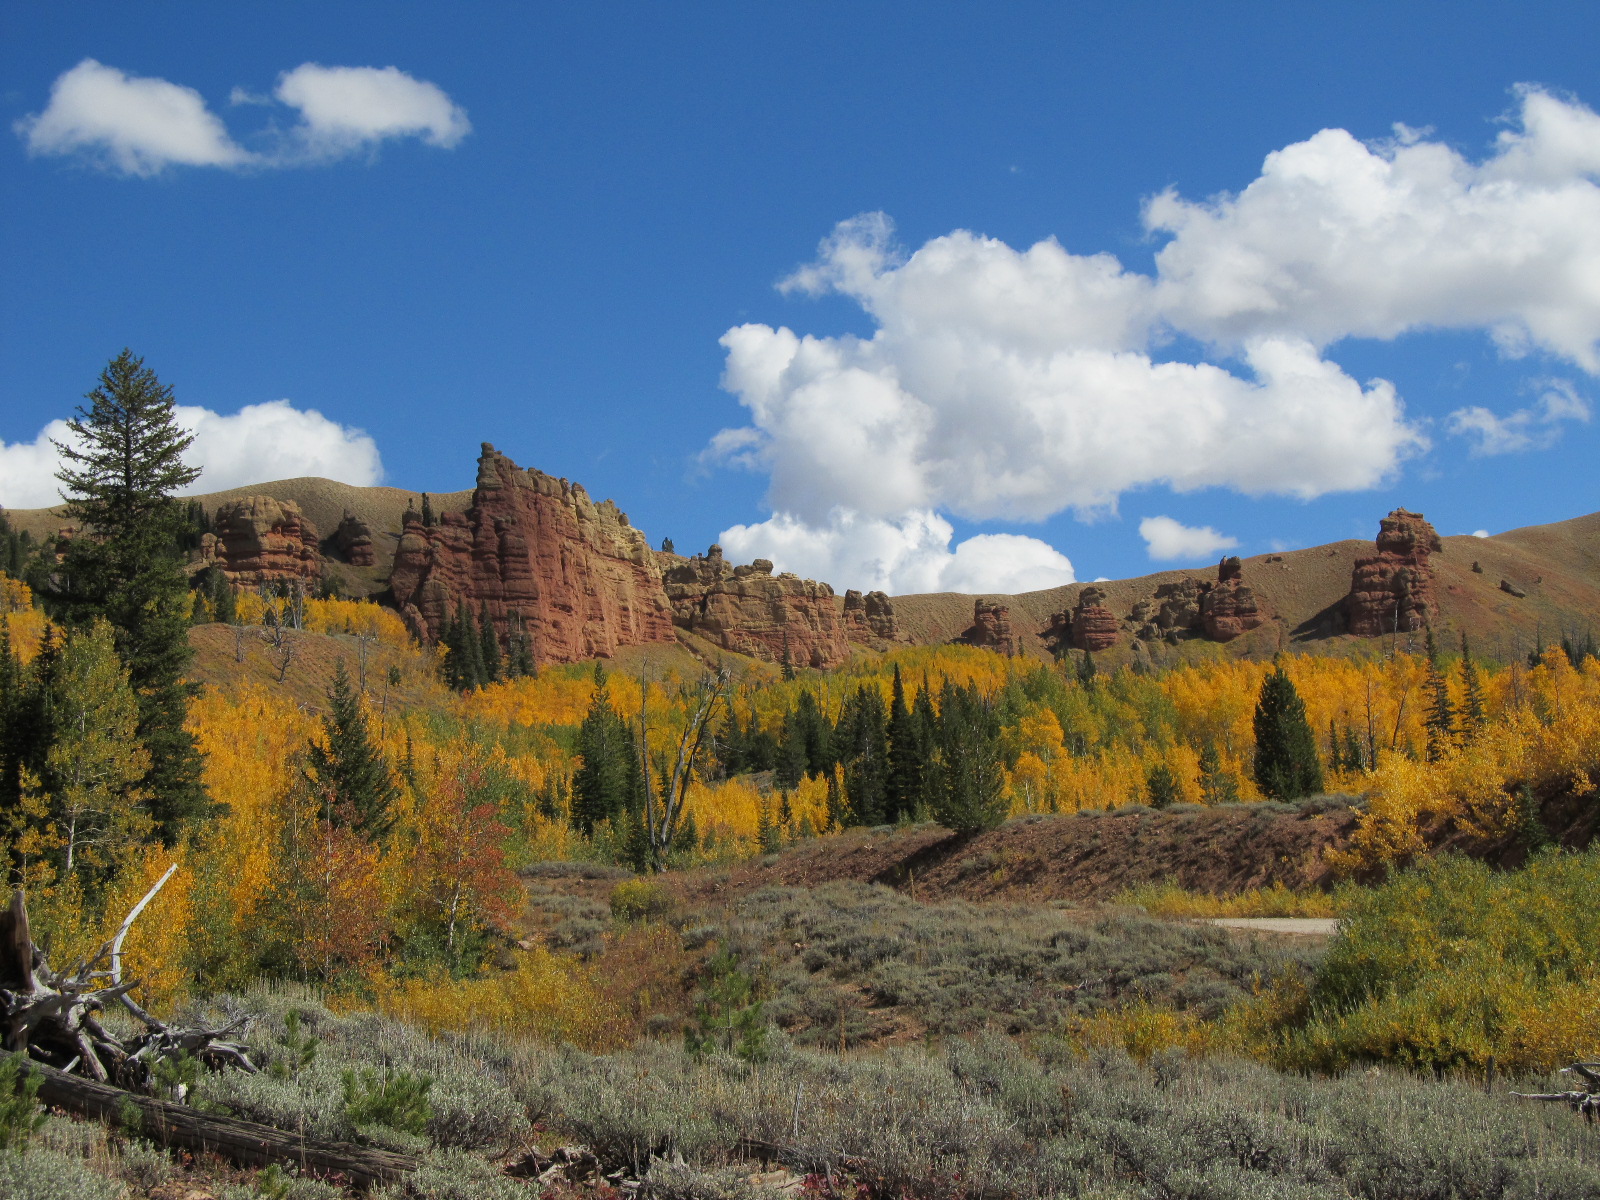
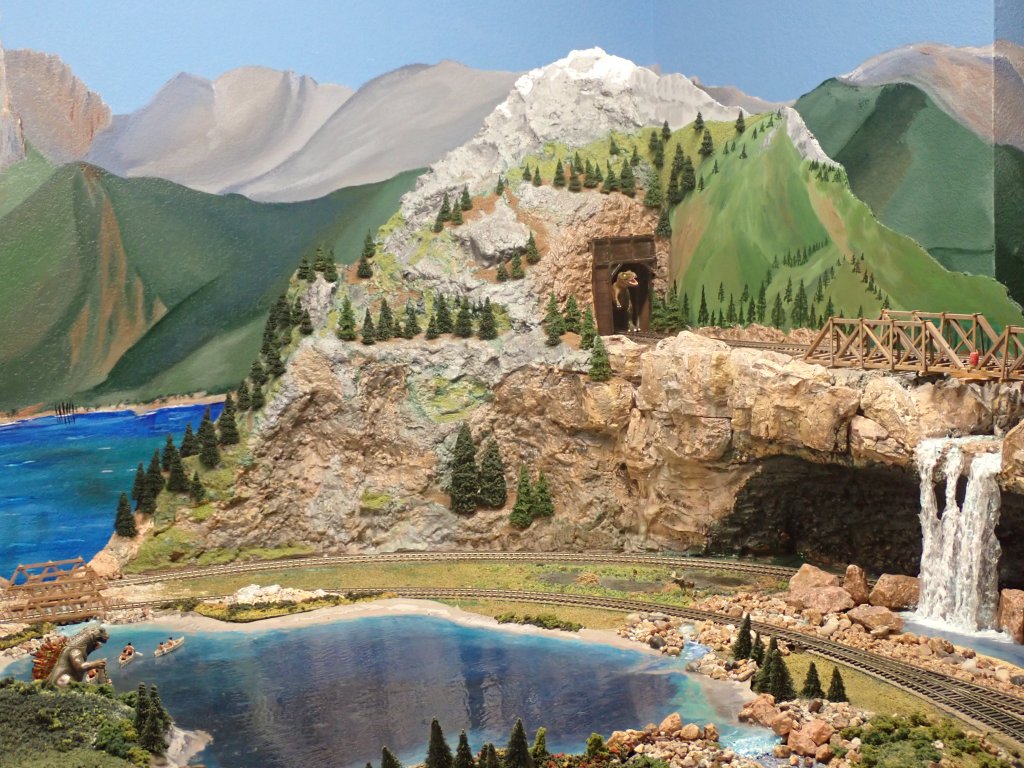
The Red Castles are a collection of rock monoliths in a setting of aspens and lodgepole pines. To see them one must travel on dirt roads through twenty five miles of sagebrush hills west of Daniel, until you reach the North Cottonwood Creek road which then forks to the south over Bare Mountain Pass. The scene is stunning, especially with the Midas touch of Autumn. It is one of our favorite spots in the Wyoming Range.
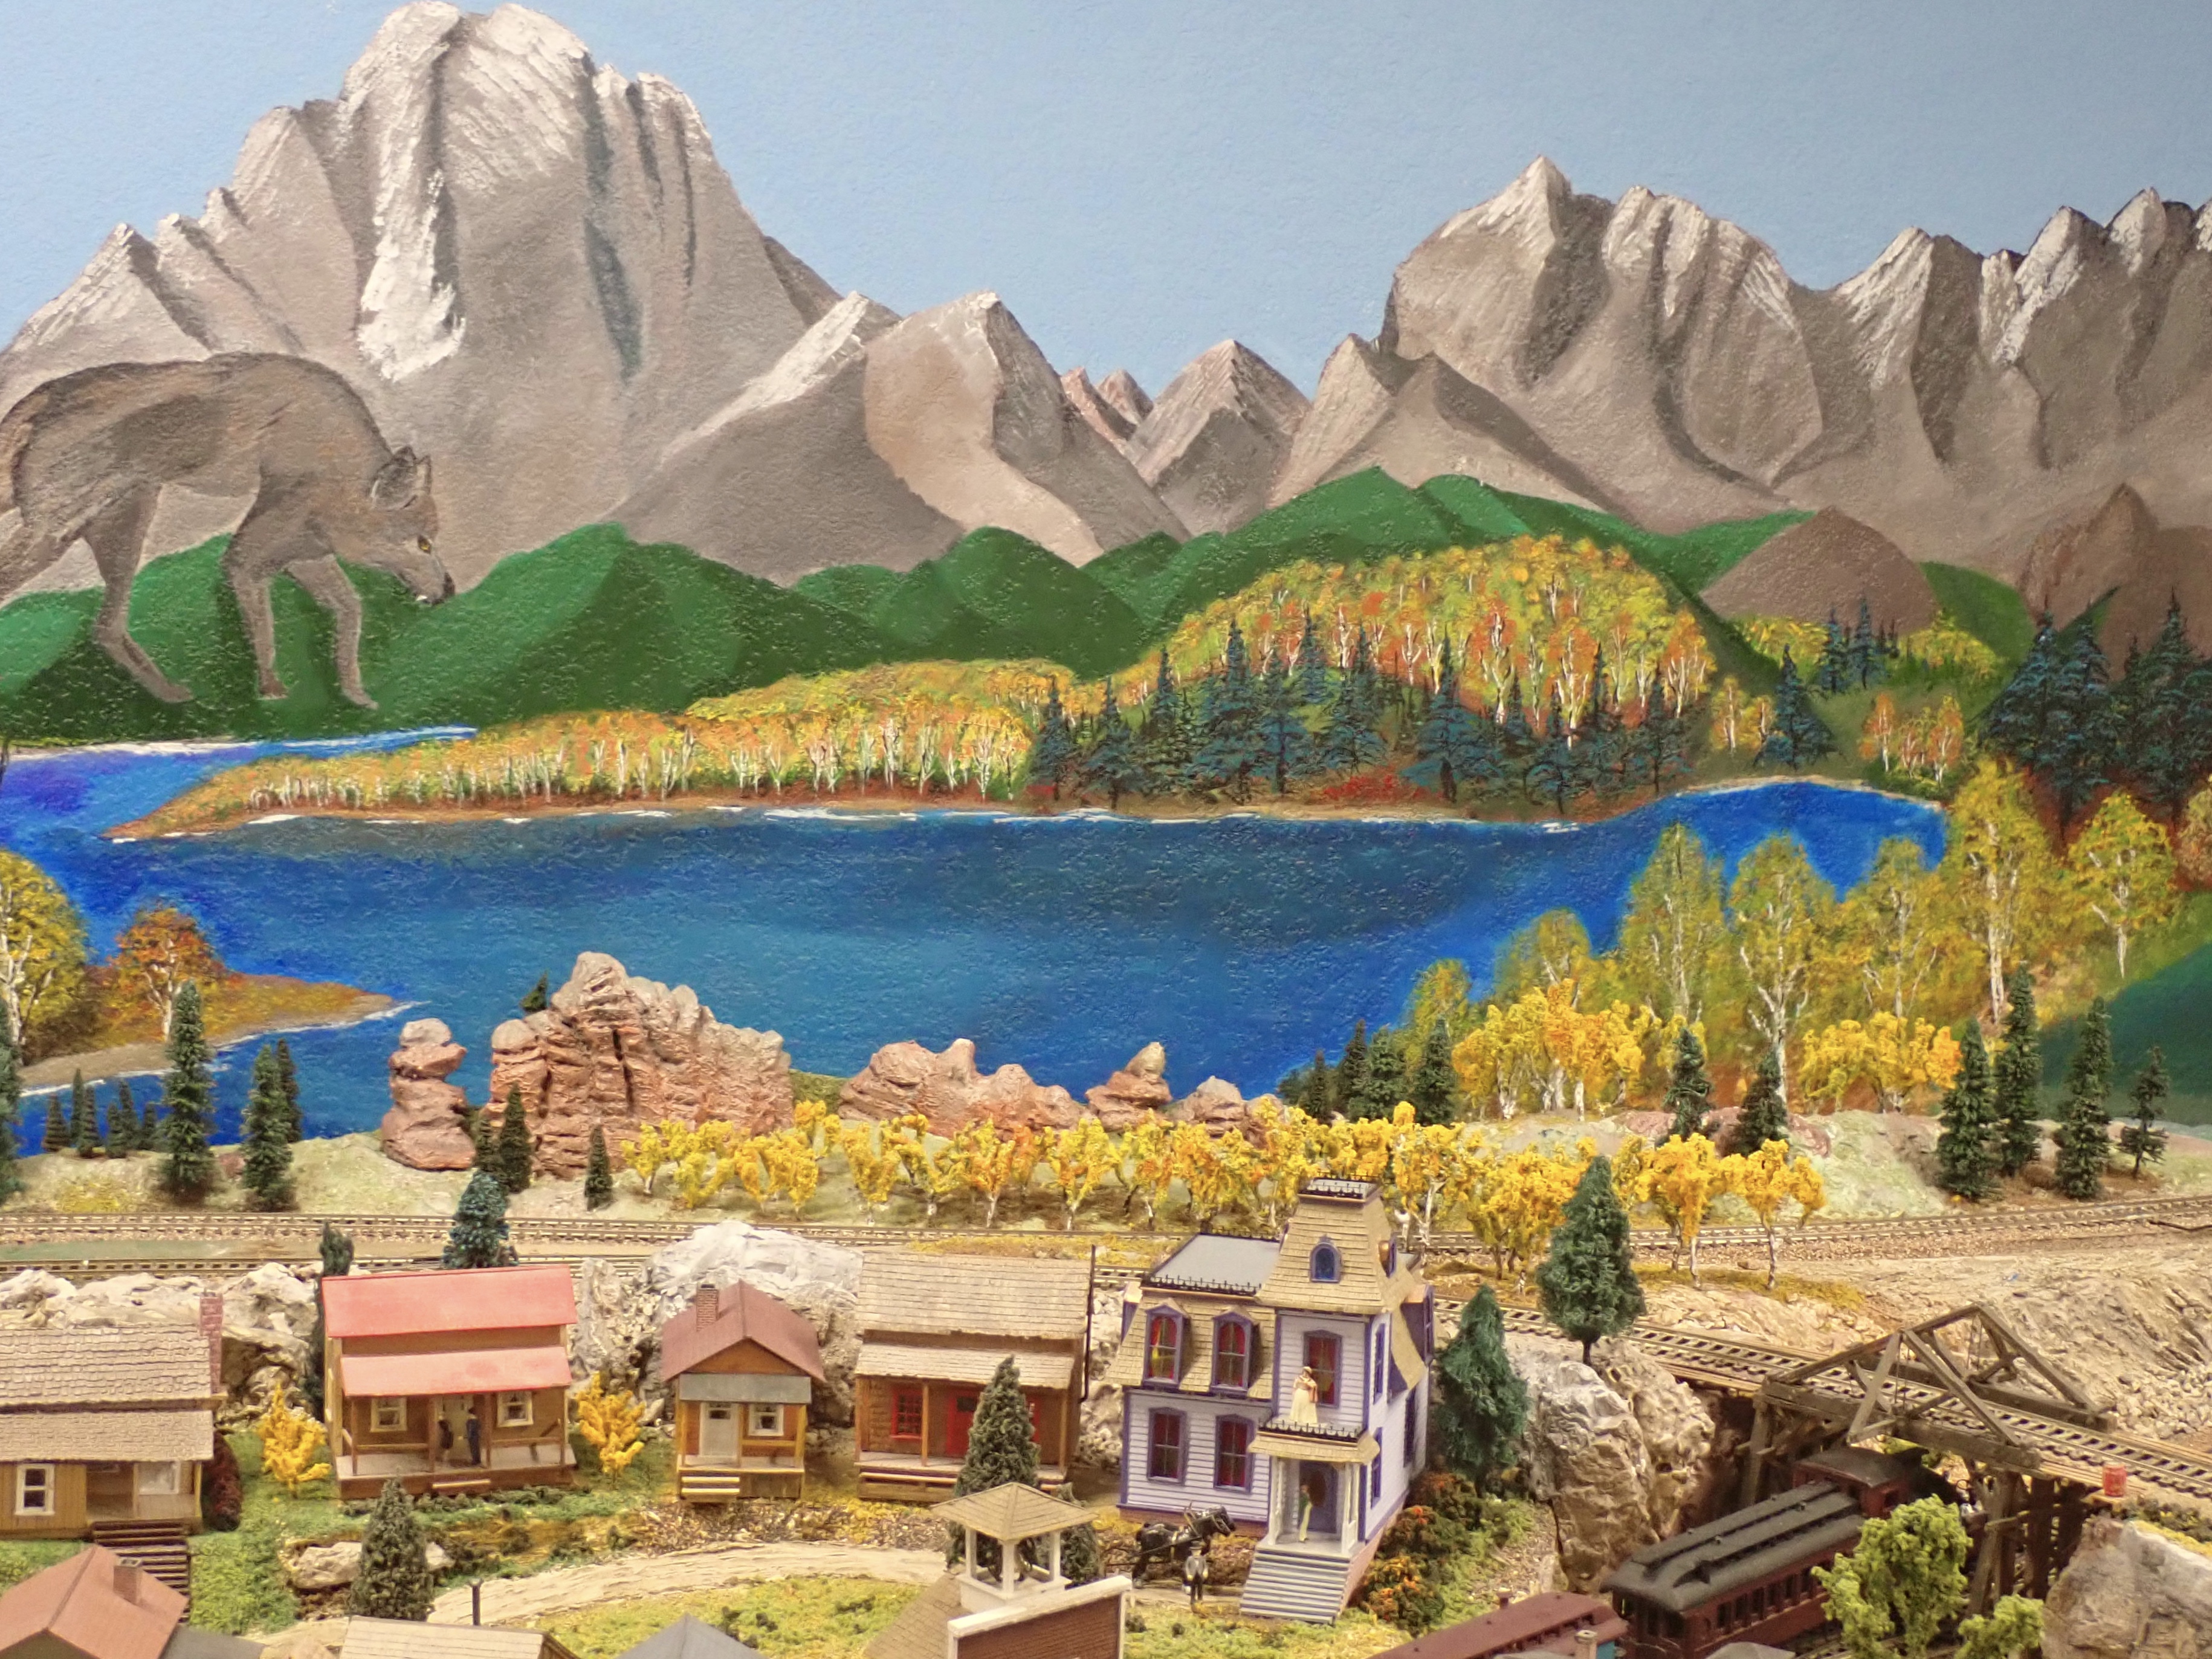
When the layout was reconfigured for our new home, the area saved for modeling the Red Castles on Seven Rivers Railroad became the town of Rocky Top at the base of the Grand Teton. Behind this village, on the other side of the tracks, was a long space only 6 inches wide. Could I build the scene here without ruining the sight line to my favorite mural? Do I build the rock formations with clay, make latex molds for casting plaster, or carve my famous paster maché? And what about acres of trees? The area is hidden away in the Bridger Teton National Forest. This will be a challenge!
If I create the barren hills that are the backdrop of these formations I’ll ruin the view. Besides, I don’t have room for them. Magnificent Mount Moran, Oxbow Bend and the sleeping form of Sacagawea (as seen through the wolf’s leering eyes,) will have to do. I think I can live with that.
To build the rock formations I traced the shapes of the two major monoliths on waxed paper over correctly sized images on my computer screen. I transferred these outlines with an Exacto knife to two inch insulation foam board (the pink stuff,) and cut these with a jig saw. I went on from there with small saws and Exacto Knives to carve two dimensions into three. It took several tries. Then, like roasting marshmallows, I very lightly heated the carvings over an alcohol lamp to weather the rough edges and seal loose biddits. (If you have carved foam, you know what a “biddit” is. Even a shop vac will not pick them all up!) I primed the carvings with black acrylic. Spray paints will destroy the foam.
The nice thing about tubed acrylics is the ability to dilute them with water, and blend them any way you choose. I really enjoyed painting, shading and shadowing the rocks. I fastened the painted carvings in place on the layout with tacky glue and wrapped them in cellophane.
Now I mixed two batches of plaster maché, (water, well soaked paper kitty litter and plaster,) and sculpted the terrain around the rock forms. The cellophane around the rocks and masking tape on the track controlled the mess and protected the painting. When the terrain had dried for a day, I painted it with acrylics to create sage hills, and added a minimum of fine ground foam for texture.
The goal with the trees was to integrate the scene with the foliage in the background mural. I also needed to create the effect of an endless aspen and lodgepole forest within the small six inch strip. Good luck with that, Mark.
I made almost a hundred trees for the scene. Two thirds of them are aspens in Autumn color. The trunks and branches, known to hobbyists as tree armatures, were twisted into shape from 26 gauge green floral wire. This task is as endless as the forest itself, but it is made easier with sharp wire cutters, several kinds of pliers, and lots of classical LP’s. The armatures are coated with two or three coats of liquid latex rubber to disguise the twists, then painted white and later mottled with dark brown to look like real aspen trunks. Finally, the branches are flocked with the appropriate colors of fine ground foam for this season.
I decided to make my own lodgepole pines for this scene since I needed a very wide array of sizes. To make these trees, various materials from jute, paintbrush bristles, coconut shell fibers and even deer hair are twisted into a loops of 22 gauge floral wire with the help of an electric drill. The results look like bottle brushes, and you can trim these any shape you want. I spray paint them dark brown before trimming, as this stiffens the bristles a little. The trees are then flocked with various shades of fine dark green ground foam. I even dry brushed a few to create some blue spruce, and shaped others as ponderosa pines.
A note about making your own trees: Most commercially sold model trees all look alike. When you make your own, you can shape each one for many different species, with sizes, shapes and colors to add variety, perspective and authenticity to your scene. This takes time. If you don’t have time, you can get great trees from “skyandlandscape” on eBay. “Busch” evergreen trees are also very good, and they can be trimmed with floral clippers to create lodgepole pines.
As an 1880’s steam train snakes through the aspens and slows to give passengers plenty of time to see the Red Castles, I’m reminded of our own fabulous excursions on the Durango and Silverton and the Cumbres and Toltec Scenic Railroads. Building this scene was a happy time, too!
Würmberg’s Redemption (January 2021)
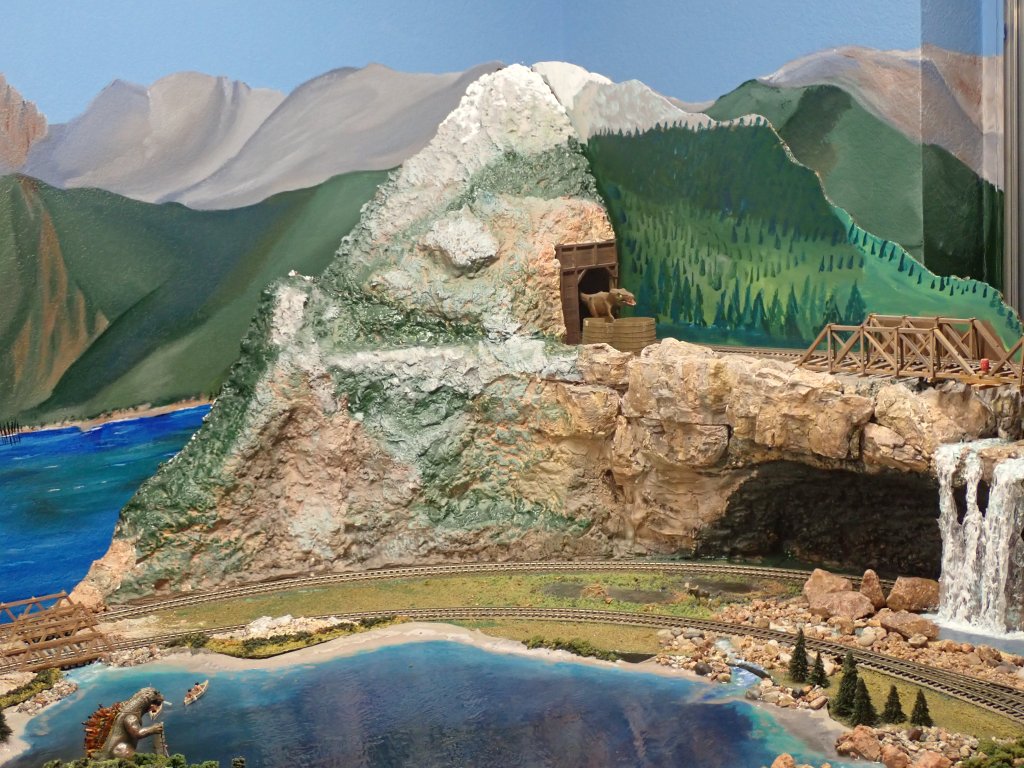
Würmberg, shown above as it looked last week, was one of my first attempts at terrain building on Seven Rivers Railroad. It was a memoir of those plastic tunnels you could buy at the old hobby shops back when I was a kid. In our old house this mountain fit in a corner, right against the walls. In our new location I wanted to walk behind the layout, so behind the truss bridge I hastily painted the other side of the mountain on art board. The paint job on the mountain itself was intended only as my guide for future scenics. I finally got around to that scenery work this week.
The lake in the foreground is removable, so access for the work was easy.
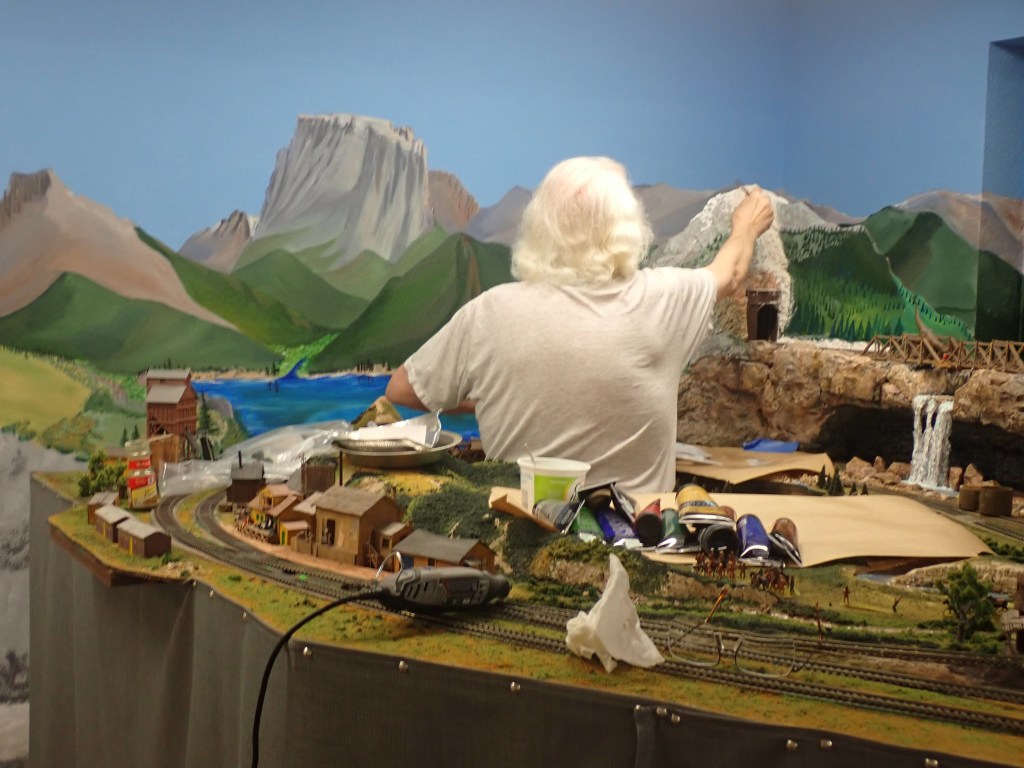
The challenges were obvious. First, I had to fill the gap between the mountain and it’s art board neighbor. Now, if you must know, Würmberg was previously named Knottjeur Butte, so I referred to that awful gap as the butte crack. I filled it with my famous mix of paper kitty litter, plaster and water. This is a mache like mix with a heavy texture, and it remains workable longer than plaster alone. It gives a rocky area appearance when it dries.
Next, I repainted the mountain, adding shadow under the rock outcroppings, fresh snow, coloring and shading the mountain geology to integrate with the rock work around the falls, and changing dark greens to a lighter color for contrast with the trees which would come later. Using Liquitex Matte Medium, I also cemented ground foams of several colors to add texture to some of these freshly painted areas.
When these areas dried I added over 90 N scale trees. I used trees from Busch (N 6572) and “Scenery Time,” from “skyandlandscape,” an eBay store.
Finally, I had to repaint the art board side of the mountain, with two goals. I wanted better integration of the three and two dimensional sides of the mountain. I also wanted to coordinate this scene with the style of the background murals. To achieve these goals, I first cemented green ground foam of the same color I had used on the mountain to a small area of the art board just below the grey rock of the peak. I cut the back halves of ten trees away, bent the trunks 90 degrees and drilled holes for them. I also used tacky glue to hold them against the textured area of the art board. While the glue dried, I spent an hour practicing painting trees, since I had not done this in quite a while. Painting and shading the art board side of the mountain was quite challenging, and I did it three times before I was satisfied. Then I added painted trees, grateful that I had practiced.
Here is Würmberg, redeemed. Würm himself roars approval, and Siegfried sounds a mighty call on his horn.
The Schwabackefeller Mansion (December 2020)
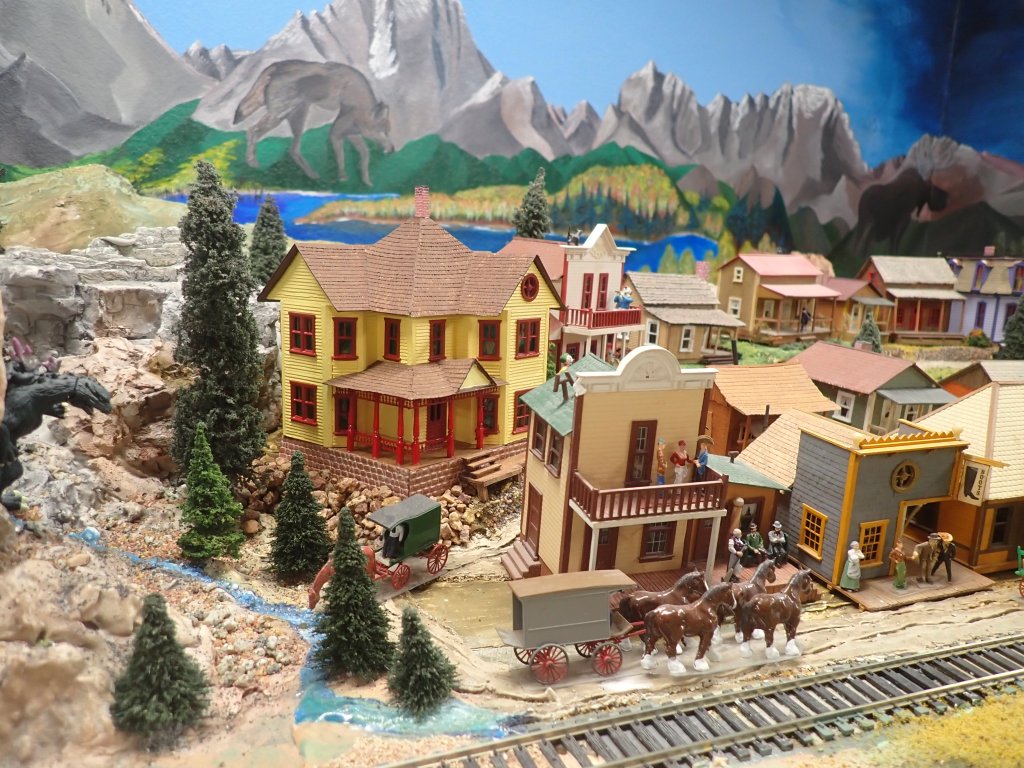
Wotan and Brunie Schwabackefeller have moved into their new home in Rocky Top. Their abode rivals that of Rocky Top’s most distinguished citizen, Lisette Knottjeur, in square footage if not sheer elegance. These folks have designs on Leadville Lizzy’s empire and fortune here at the foot of the Grand Teton. While Wotan is busy buying up all the land he can get his hands on, with the idea of creating a future national park, Brunie has every intention of keeping it all for herself. She intends to run it as one hell of a dude ranch and she already has a name for it in mind: Lost and Found Creek Ranch. To those ends, he bought the Left Bank of Rocky Top, and she got a realtor’s license.
Without a fence, their pet Fafner can be seen on the loose in the left of the photo. He is bound to make some friends in the surrounding area.
Respectable Republicans, Brunie and Wotan have just returned from Washington, having been invited to a splendid party at the White House by the ousted incumbent. It is not known if they participated in the insurrection at the Capital which followed the after dinner drinks, as rumor and speculation most certainly suggest. In any case, I’m sure they think a pardon is likely before the inauguration.
Mme. Knottjeur, a Democrat, is on top of the situation. She is ordering every journalist at her newspaper, The Rocquie Toppe Picayune, to make up stories and to advance opinions which condemn the violent outrage at the Capital, and the Schwabackefeller’s likely participation.
(Construction notes: This mansion began as a kit: HO scale Gran’ma’s House No. 307 by Campbell models.)
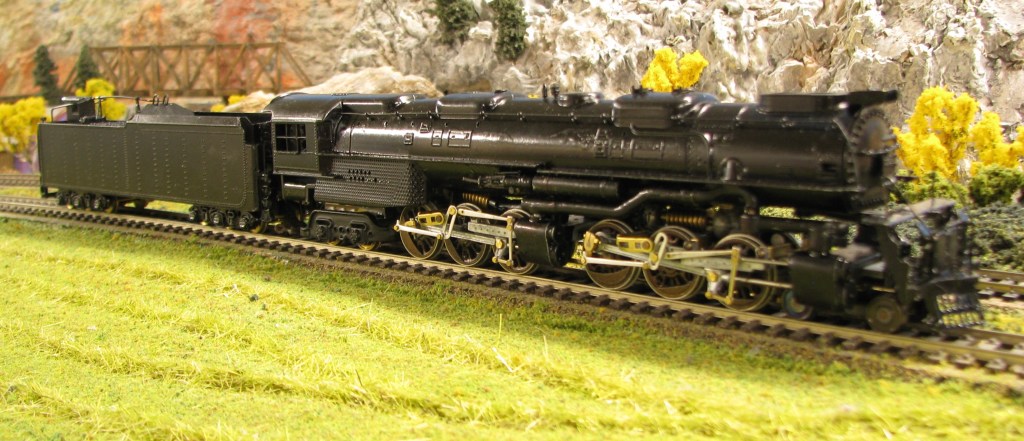
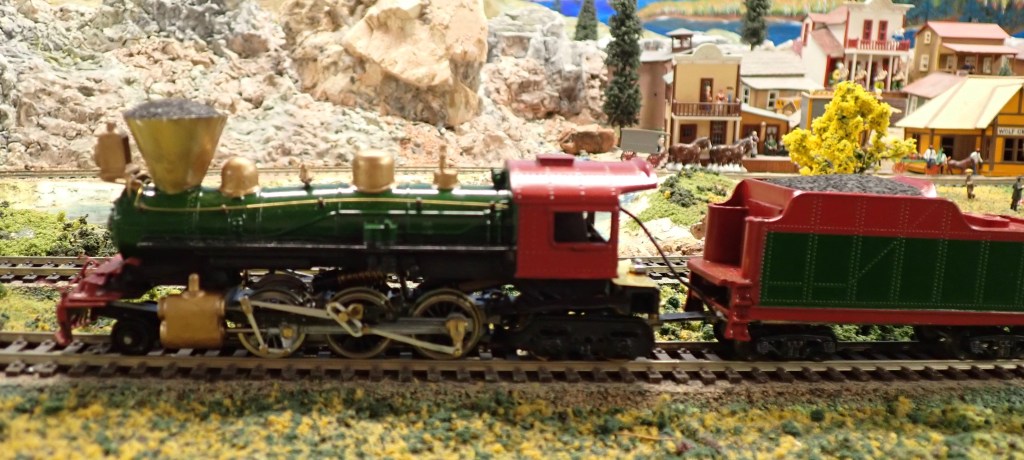
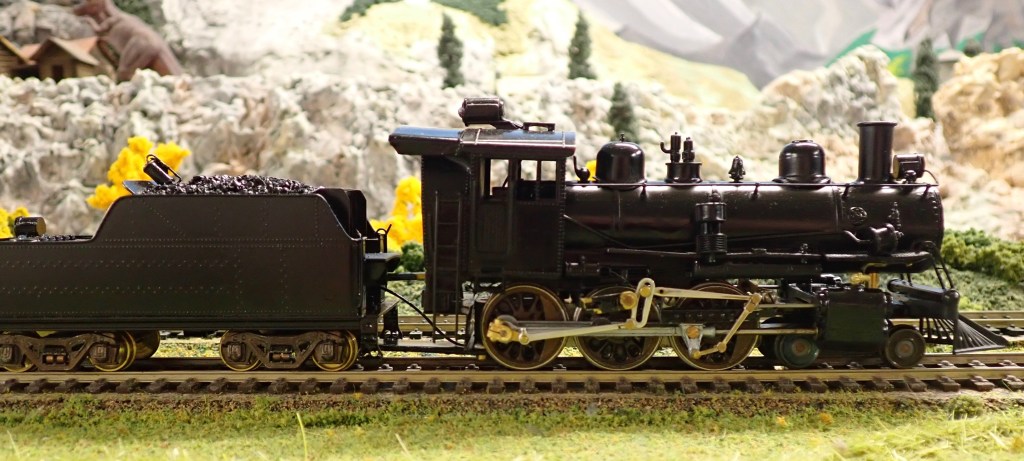
A Roundhouse Mogul (2-6-0) Kit (June, 2020)

I just finished, although it is not yet painted, another Roundhouse steam locomotive kit, which just might pull the Corona Train. This one is a Mogul (2-6-0) with 63 inch drivers. If you are modeling a specific locomotive, I have found Roundhouse Mogul kits with 51” drivers, so check your diagrams and make sure you get the right one for your project. (These kits look identical otherwise. They offer alternative details to model the era of your choice.) I chose an 1880’s style, and I knew at the outset that I will have to accept an oversized boiler with this kit for my chosen era.
I want to share some ideas about these kits which may be helpful if you have not built one before. The instructions that come with the kits are quite adequate, but be prepared for filling in some blanks. On this particular kit, the various parts of motor and gear assemblies fit beautifully, except that the step up gear was too tight. It must rotate freely, but without wobble, so I had to figure out how to enlarge the hole without drilling or filing. I rubbed some polishing compound on to the axel, and with a toothpick I rubbed a little compound in the hole of the gear before assembly. Don’t tap the axel into the frame too far, or you can’t get the gear on! Once installed, work the gear by hand for a few minutes until it is somewhat loose.. Then install your motor and check if you can turn the gear easily by finger turning the armature. If this works you can then apply power, slowly at first, and then gradually faster for about five minutes. Now the gear will turn smoothly and evenly. I flushed out residual polish with gear oil. By the way, I had a model railroad friend suggest that I use a mildly abrasive toothpaste to break in tight parts like this, so that might work also. (You will repeat this breaking-in process when you have installed the drivers, side rods, main rods and crossheads.)
Some of the locomotives in my Roundhouse fleet have a little wobble. I used to think that was because the drivers fit into slots that may have been cast or milled with slight imperfections. I smooth these slots carefully and minimally with a small round file. Sometimes, however, I can see that a driver is not exactly perpendicular with the axel. I have tried to remedy this by removing the driver from the axel with a NWSL puller and re-setting it with a Sensi-Press, paying close attention to exact quartering. Unfortunately, this did not cure the problem. Unless you can find another driver assembly, be prepared to tolerate a small bit of wobble. Remember that back in the day track was put down as quickly as possible with many imperfections. You may choose to use this excuse for historical accuracy, telling your visitors that it takes many painstaking hours to achieve the correct amount of wobble.
The lead truck assembly required some adjustments, and I think it is easier to install the pilot coupler before fitting the lead truck as suggested in the instructions. You will have to modify either the coupler cover or the lead truck casting (or a little of both,) to get them to fit. The lead truck arm is too long at the rear and will have to be filed down so as not to interfere with the bottom plate screw. You may not be able to fully tighten the screw at the rear of the lead truck arm, since the bottom plate screw interferes. This is not a bad thing, and may even be intentional, as it allows the lead truck to pivot freely. For the pilot coupler I used a Kadee medium center set shank whisker coupler which was easy to install and is the correct coupler height.
Now that the mechanism is working smoothly, it is a good time to assemble the tender so you can do a track test. On this kit I had to file the cast metal tender floor quite a bit on the sides to get it to fit well in the plastic tender body. I also had to use thick Bowser washers (#653) between the trucks and the floor to get the coupler height just right. To me, the visual effect is more realistic as well. Using these washers will require 1/4” self tapping screws instead of the 3/16th” screws provided in the kit.
Detailing the boiler is always a fun part for me, and I often try something new. This time I tried to improvise a cute curved handrail around the boiler, using a single length of brass wire which would extend to both sides of the locomotive. I tried bending the wire after one side had been installed, and ended up breaking all of the tiny plastic stanchion fittings (not the stanchions themselves) molded on that side! I was able to epoxy the stanchions in place and painting will disguise the error. If you want to try this, do all your bending first before inserting the stanchions. I’ll add here that most of my kits are many years old, and both plastic and cast metal parts may have become brittle. Be careful! The instructions in this kit were printed in 1978, so this kit may be quite old.
I’m usually content with the plastic details included, but I always go through an assortment of Cal Scale, Cary or other brass castings which I have acquired over time, using those which are appropriate. I also have a selection of various sizes of brass wire to do piping and railings. (I generally leave out the fine wire used for bell and whistle ropes, unless the model is intended for display only. We have cats.) For me, generic detailing is OK, but if you are following a specific prototype you will enjoy scouring photos and catalogues for the correct appliances. Having said this, I’m not satisfied with the pilot which is cast on the Roundhouse frame. The “cowcatcher” (which we used to call it when we were kids,) is too short for the 1880’s. I have in the past used pilots from Pocher / Rivarrossi derelict locomotives, but I don’t have one just now. Frankly, I would rather restore a derelict than part it out, and I wish history had treated the original old locomotives with the same respect.
We live in an era when a model railroader can go into a shop a drop a few bills ($100’s) on a beautiful RTR locomotive, unwrap it, and then make a You tube video. There are some really nice RTR’s available, and I enjoy the videos! Even if you are an RTR fan, I encourage you to try building and painting a locomotive for your layout. ThIs just might become a big part of the hobby for you! Most of the locomotives in regular service on Seven Rivers Railroad were built by me, and a few were built by my father in law. This has given us great satisfaction, as it will give you. When I build the kits, I study available plans, photographs, and detailed brass models so I can continue to learn more about the locomotives. Building locomotive kits gave me the confidence, skills and experience to tear down expensive brass models and get them rolling smoothly again.
I’ve built several Roundhouse and Tyco kits, and the smaller locomotives fill an important niche for modelers who enjoy the early days of American steam. These have been reliable workhorses for years on my layouts. They are easier to build than the Bowser kits, so they are a good place to start. Some of the Tyco kits have rubber traction rings. Although these rings are not prototypical, they pull nice loads, and you can’t see them in photos. I like them.
Bowser locomotive kits are more complex and challenging, especially with regard to preparing the cast boilers and riveting the valve gear. (Don’t be intimidated. If I can build them, so can you!) They are nice and heavy, and they do not need traction rings. I love building and running the Bowsers, so if you enjoyed doing a Roundhouse or Tyco kit, give a Bowser a try. I will try to do an article with tips to building them this year.
The most important thing I’ve learned about building locomotives is that backtracking is often necessary. You complete step 1 carefully and go on to step 2: then test carefully to see that these steps work together. Then you go on to step 3 and it works with step 2, but not step 1, so you backtrack and make adjustments. By the time your engine is completed and running really well, you may have covered the same ground several times. This was frustrating to me at first, only because of the false preconception that I could go directly through each step in order to complete the locomotive. The backtracking and troubleshooting are definitely a part of the process. I love it and I’m not in a hurry. This kit runs really well!
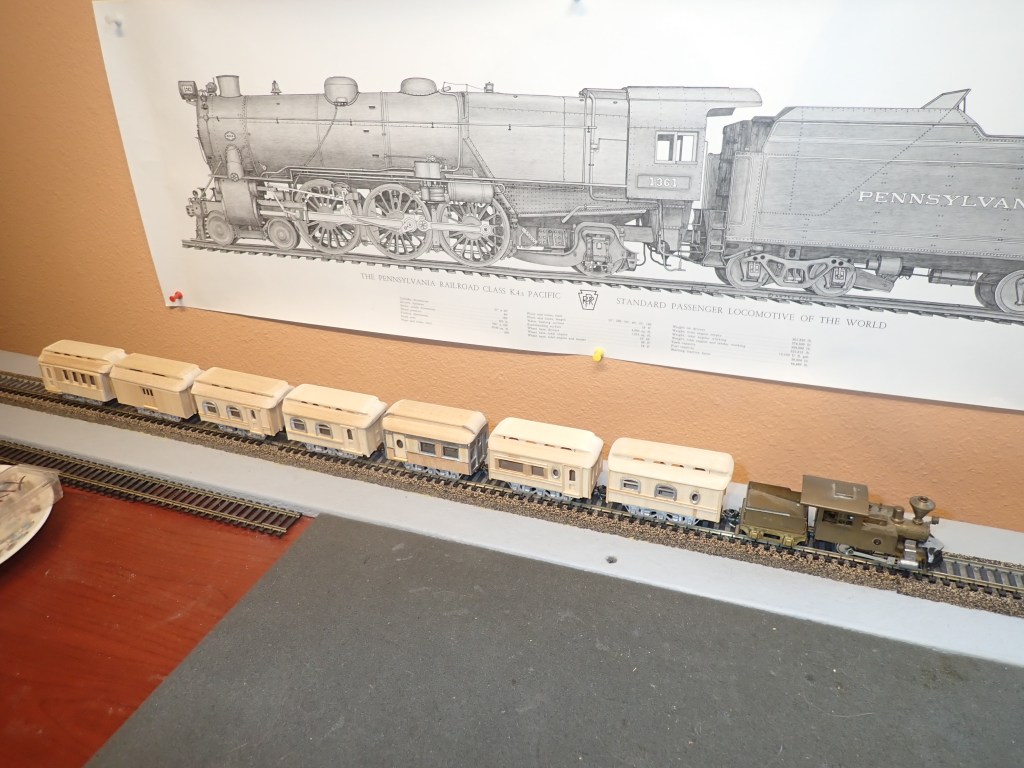
Corona Coaches, June 2020
Seven Rivers Railroad is doing its best to safely meet the needs of our passengers during this plague, the likes of which will probably not recur for 150 years or so.
We have re-assembled two full sized coaches into seven family sized affairs in which passengers may travel in isolation and comfort through our lovely countryside. Five coaches are each equipped with four to six swiveling parlor chairs so that each occupant may face any of the large windows, taking advantage of the many favorable views. These seats are heavily padded and luxuriously upholstered, no expenses spared, and each of these is spaced a minimum of six feet from its neighbor. Face masks and hand sanitizer are placed at convenient locations in each coach and at all stations, though we have noticed that hardly anyone is using them. Each coach has its own lavatory, equipped with at least one dozen rolls of therapeutic paper per passenger.
The proportionally sized baggage car has been changed from its customary position behind the locomotive to the penultimate location, just ahead of the final car, which is not a caboose. This baggage car separates The Last Coach, commissioned especially by The Last Mostly Reformed Church, from the rest of the train. This car has pews arranged exactly as they are in the church building, with a capacity of thirty, not counting children on laps. These folks are exempt from social distancing, having the right of practicing our much cherished religious freedoms. Anyway, Divine Intervention will keep them safe come hell or high water.
Speaking of the latter, Seven Rivers Railroad has adopted the following policy for the protection of the rest of us: The Last Coach shall be separated from the train not less than one mile before the station where its passengers may disembark or not. They must then swim across a freezing and raging river to get to the closest public accommodations in town. This is considered an acceptable form of decontamination, and baptismal requirements may be simultaneously fulfilled.
A color scheme for this train is conspicuous in its absence, but will most likely closely follow the colors illustrated by Currier and Ives, Jaundice Yellow with Colloidal Silver trim.
Technical details: These coaches were kit bashed, mostly from two 1890’s coach kits from La Belle, with Kit Bits six wheel passenger trucks. The idea comes from the old Piker and Oskar coaches by Walthers. (If I had known about these when I was a kid, Santa would have found them in my annual wish letter!) These still show up from time to time on eBay, and bids are pretty high for them individually. The cost of a train of 7 would be outrageous, so I built my own. The third car behind the locomotive in the photo is a Walthers kit from 1956, with thin wood siding and trimmings from other old kits to convert it to an earlier era.
A Bowser Challenger converted into two small steamers (December, 2019)
Here is a Bowser Union Pacific Challenger that I built last year. I wanted the challenge of building the kit knowing from the beginning that it would probably be too big for my Seven Rivers layout. It came out really well, running smoothly and looking great, but it was indeed too big to negotiate back-to-back turnouts that formed an S shape.
It was too nice to sit on a shelf so I tried to sell it on eBay for less than half of what I put into it, but it did not sell. Could I use the parts? I decided to take the Challenger apart and use the front and back mechanisms for two different locomotives.
The Christmas Locomotive used the rear mechanism from the Challenger and the original motor. The drivers were replaced with 63″ drivers from Tyco General kits. The trailing truck from the Challenger was used and a two wheeled pilot truck was added for an somewhat weird 2-6-4 wheel arrangement. The boiler was left over from a Bowser Consolidation kit I had used to rebuild a Hallmark brass locomotive that was inoperable. (I’ll try to show you that project soon.) The funnel stack, early American style headlamp and other details conjure up an earlier era than the Challenger. The tender is a Bowser kit tender.
The Ten Wheeler used the front mechanism from the Challenger including the original drivers and lead truck. The boiler is from a plastic Roundhouse switcher, and the cab is from a damaged Mantua articulated lumber locomotive which I rebuilt. (I’ll show you that one in a different project.) I added a cowcatcher type pilot too. On this loco I put the motor in an old Akane brass tender, using a power transmission I learned from an eBay friend. There is a ton of detail on this one.
Both of these locomotives run very well on Seven Rivers, and they offered many challenges in their construction. Prototypical? Not so much, but they look cool with Christmas and freight trains. So the Challenger fulfilled its purpose twice, and I have two locomotives to show for it. Does anyone need a Bowser Challenger boiler?
